The ability to transform a series of 2D photographs into an accurate, measurable 3D digital model is nothing short of revolutionary. Photogrammetry has become a cornerstone technology in industries like construction, mining, surveying, and infrastructure inspection. At the heart of this process lies a critical, often underestimated phase: the flight itself. A poorly executed drone flight will inevitably lead to a poor-quality 3D model, regardless of the sophistication of your software.
This guide is designed for enterprise operators—pilots, surveyors, and project managers — who need to move beyond casual aerial photography and master the disciplined art of capturing data for photogrammetry.
Part 1: The Foundation – Pre-Flight Planning
Success in photogrammetry is determined before the drone even leaves the ground. Meticulous planning is non-negotiable.
1. Define Your Deliverable and Accuracy Requirements:
Before planning your flight, you must know what you are building. Ask yourself:
- What is the final product? A topographic map? A volumetric calculation for a stockpile? A 3D model for architectural planning?
- What level of accuracy is required? Do you need centimeter-level absolute accuracy, or is relative accuracy for visual inspection sufficient?
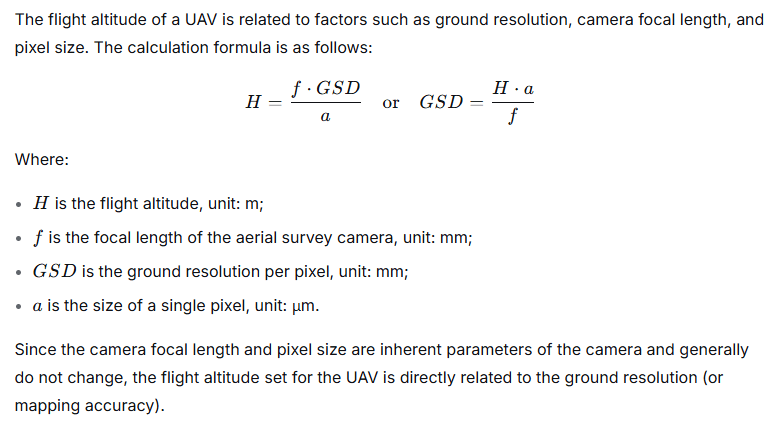
- What is your Ground Sample Distance (GSD)? GSD reflects the relationship between a single pixel in the image and the actual distance on the ground. For example, a GSD of 3cm means that a single pixel in the image corresponds to an actual distance of 3cm. It is the single most important factor determining the spatial resolution of your model. A smaller GSD (e.g., 1 cm/px) means higher detail but requires flying lower, which increases flight time, or using a better camera (capturing more pixels). Calculate your GSD based on your project’s needs with reference to the formula below:

- Define the Aerial Survey Area. Before planning the flight route, it is necessary to define the project’s flight range within satellite mapping software, understand the terrain of the survey area, and perform reasonable division of flight sorties. This optimizes the flight plan, improves operational efficiency, and helps avoid drone collision accidents. For areas requiring aerial surveys within controlled airspace, airspace approval should be obtained prior to conducting the survey.
2. Mission Planning Software is Your Co-Pilot:
Enterprise drone operations rely on automated flight planning apps like DJI Pilot 2, Tiki3DPathing etc. These tools allow you to define your region of interest (ROI) and let the software calculate the most efficient flight path. For photogrammetry, you will primarily use two mission types:
- Double Grid (or Cross-Hatch) Mission: This is the gold standard. The drone flies over the area twice—once in a north-south pattern and again in an east-west pattern. This ensures that every feature on the ground is captured from multiple angles, which is crucial for rebuilding complex vertical structures like building facades or stockpile walls.
- Single Grid Mission: Suitable for relatively flat terrain where the primary goal is orthomosaic (top-down) mapping. It’s faster but provides less data for 3D geometry on vertical surfaces.
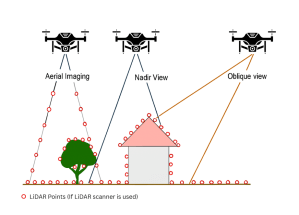
- Oblique Capture Missions: For the best 3D modeling results, oblique imagery is essential. This can be achieved through two primary methods:
- DJI Smart Oblique (Five-Angle Oblique): This is a game-changer for capturing complex structures. When you select this mode in DJI Pilot 2 or other supported apps, the drone automatically flies a mission where it captures imagery from five separate angles: one nadir (straight down) and four oblique (typically 45°) shots from the front, back, left, and right of every position along its flight path.
- Why Smart Oblique is so effective for Enterprise Photogrammetry:
- Automated Complexity: It eliminates the guesswork and manual planning of creating a multi-angle mission.
- Superior 3D Models: It provides the rich, multi-perspective data needed to generate highly detailed and accurate 3D models of structures.
- Dedicated Oblique Camera Systems (e.g., Tiki3D T505 MiniMonster): For the highest-fidelity data capture, specialized hardware takes this concept further. When users employ a system like the Tiki3D T505 MiniMonster Oblique Camera, the process is revolutionized. Instead of the drone moving to five positions, this custom rig features five synchronized cameras. At every exposure point, it simultaneously captures five images at 61 megapixels each, with each camera fixed at a different angle (one nadir and four obliques).

- The Advantage of a Dedicated Oblique Rig:
- Unmatched Speed and Efficiency: It captures all five angles instantly, drastically reducing flight time and eliminating any potential for changes in lighting or shadow between shots.
- Maximum Resolution: With five high-resolution 61 megapixel sensors, the level of detail captured for every part of the scene is immense.
- Guaranteed Calibration: The cameras are rigidly mounted and pre-calibrated, ensuring perfect geometric alignment for the most accurate 3D reconstruction possible.
3. Key Mission Parameters:
- Front and Side Overlap: This is the heart of photogrammetry. Frontlap (or forward overlap) is the overlap between consecutive images in the flight path. Sidelap is the overlap between images from adjacent flight lines.
- Enterprise Standard: 80% Frontlap, 70% Sidelap. Do not deviate from this without a specific reason. High overlap provides the software with more redundant data points, leading to a more robust and accurate model.
- Enterprise Standard: 80% Frontlap, 70% Sidelap. Do not deviate from this without a specific reason. High overlap provides the software with more redundant data points, leading to a more robust and accurate model.

- Camera Angle: For most mapping of horizontal surfaces (like a construction site), a nadir (straight down, 90°) angle is used. To capture facades and vertical elements, you must incorporate oblique imagery (e.g., 45° angles). Many advanced missions can combine both in a single automated flight.
- Flight Altitude: This is determined by your desired GSD and local regulations. Higher altitude means a larger area covered per image but a larger GSD (less detail). Always respect maximum altitude limits.
- Check Your Checkpoints: With Tiki3D software’s superior aerotriangulation algorithm, you could achieve high accuracy even without Ground Control Points (GCPs). However, if high absolute accuracy is required, you could use Ground Control Points (GCPs) or a Real-Time Kinematic (RTK)/Post-Processing Kinematic (PPK) drone. GCPs are physical markers (e.g., checkerboard patterns) placed across the site, whose precise coordinates are surveyed with a GNSS rover. The photogrammetry software uses these known points to “pin” the model to the real world, correcting for any cumulative errors.
Part 2: Execution – The Data Capture Flight
With your plan loaded, the focus shifts to flawless execution.
1. Pre-Flight Checklist:
- Weather: Check wind, precipitation, and most importantly, lighting. The ideal conditions are a uniformly overcast day. Direct sun creates harsh shadows and overexposed highlights, which confuse the photogrammetry software. Avoid flying when the sun is low, casting long, moving shadows.
- Equipment: Drone, batteries (charged, with spares), propellers, SD card (formatted, with ample space), tablet/controller charged.
- Camera Settings:
- Manual Mode is better. Automatic exposure will change between shots, creating inconsistencies in color and brightness that can affect the image-matching process.
- ISO: Keep it as low as possible (e.g., 100-200) to minimize noise.
- Shutter Speed: Use the “180-degree rule” as a starting point—your shutter speed should be roughly double your frame rate. Since you’re taking stills, aim for a fast enough shutter speed to eliminate motion blur from the drone’s movement. A good rule of thumb is 1/1000s or faster.
- Aperture: Stop down to f/4 or f/5.6 to ensure a deep depth of field, keeping the entire scene in focus.
- Focus: Set focus to infinity or manually focus on a point in the middle distance and then lock it.
- File Format: Shoot in RAW (.DNG) if possible. RAW files contain vastly more data than JPEGs, giving you much greater flexibility to correct white balance and exposure in post-processing, which leads to a cleaner, more consistent dataset. However, shooting in JPEG reduces the trouble for post-processing (just ensure your aerial photos have the correct exposure levels during the flight).
2. In the Air: Maintaining Data Integrity
- Trust the Automation: Once you initiate the automated mission, let it run. Modern drones like DJI Enterprise drones delivers great reliability. The drone will maintain a consistent speed, altitude, and overlap. Manual flying cannot achieve this level of consistency.
- Monitor, Don’t Micromanage: Keep an eye on the telemetry—battery life, GPS signal strength, and image capture counter. Ensure the drone is capturing images as expected.
- Speed and Motion Blur: The automated mission will set a speed appropriate for the camera’s intervalometer (the rate at which it takes pictures). If you must fly manually for a specific reason, fly slowly and steadily. Jerky movements are the enemy of good data.
Part 3: Beyond the Basics – Enterprise-Grade Considerations
1. The RTK/PPK Advantage:
- For survey-grade accuracy, enterprise drones like the DJI Matrice 350 RTK or DJI Matrice 4 RTK are essential. These systems use satellite correction data to geotag each image with centimeter-level accuracy. This dramatically reduces (or even eliminates) the need for numerous GCPs, saving significant time on the ground. While a few Checkpoints are still recommended for validation, the bulk of the surveying work is done from the air.
2. Dealing with Complex Terrain:
- Flying over a site with significant elevation change? A flat, nadir-only mission will result in a variable GSD and poor data on slopes. Use mission planning software that supports terrain follow, where the drone uses a digital elevation model (DEM) to maintain a constant height above the ground, ensuring a consistent GSD across the entire site.
3. Capturing the “Unseeable”: Corrosion, Cracks, and More:
- For inspection tasks, your “aerial image” might be more than a standard photo. Using a drone equipped with a zoom camera (like the DJI H20T) allows you to capture wide context shots and then zoom in on specific areas of interest from a safe distance. For specialized applications, thermal or multispectral sensors can be used for photogrammetry to create 3D models showing heat leaks, moisture, or plant health.
Part 4: From Flight to Model – The Post-Flight Process
The work isn’t over when the drone lands.
1. Data Transfer and Verification:
- Safely transfer all images and the flight log from the SD card to a secure, organized folder structure. Do a quick visual check of the images to ensure there are no unexpected issues like lens fogging or propeller strikes in the frame.
2. Processing with Photogrammetry Software:

Import your image set into professional software like Tiki3D Reality 3D Modeling Suite. The processing pipeline typically involves:
- Aerotriangulation (Alignment): The software finds matching points between images to calculate camera positions and build a sparse point cloud.
- Building the Dense Cloud: The software uses the aligned images to generate a much denser point cloud, representing the 3D shape of the site.
- Texturing and Model Generation: The software drapes the original images over the dense cloud to create a photorealistic 3D mesh or a georeferenced orthomosaic and digital surface model (DSM).
Your careful work during the flight—consistent exposure, high overlap, and stable flight paths—will pay dividends here, resulting in faster processing times and a higher-quality final product with fewer errors.
Conclusion: Precision from Takeoff to Touchdown
Capturing aerial images for photogrammetry is a science, not an art. It demands a methodical approach where every parameter is considered and controlled. By investing time in rigorous planning, executing your flight with precision, and leveraging enterprise-grade tools, you transform your drone from a flying camera into a powerful data collection sensor. The result is not just a pretty picture, but a rich, accurate, and actionable digital twin that drives informed decision-making, saving time, money, and resources on the ground.
Tiki3D signing off.

Leave a reply to meshdynamics Cancel reply